アニメーション制作に役に立つシェーダーをまとめ
本記事ではアニメーションや合成に必要なシェーダーをまとめてみました。
加算とアルファブレンド モバイルシェーダーとの比較
通常とモバイルのシェーダーの違いが気になったので比較してみました。
加算とアルファブレンド モバイルシェーダーとの違い
76行 ↔ 25行
コードが減っているだけで、基本的にアルファのアニメーション使うときは通常のシェーダーで良さそうです。
(そこまでパフォーマンスの大きな差はでないそう)
ちなみに通常版から、TintColor付きのモバイルになるようにコードを削除したのですが、断念しました。
加算とアルファブレンドの違い
基本的に、1行だけ変更すれば良さそうです。
コードの違い
<加算>
Blend SrcAlpha One
Cull Off Lighting Off ZWrite Off Fog { Color (0,0,0,0) }(通常版のみ)
⇅
<ブレンド>
Blend SrcAlpha OneMinusSrcAlpha
Cull Off Lighting Off ZWrite Off(通常版のみ)
代用
TintColor付きのモバイルシェーダーはこちらのシェーダー(行数:68)で代用してみることにしました。

<Alpha Blendedに変更する>
下記のコードを差し替え
Blend SrcAlpha One → Blend SrcAlpha OneMinusSrcAlpha に変更
<4.xで使うには>
下記のコードをコメントアウト
UNITY_FOG_COORDS(1)
UNITY_TRANSFER_FOG(o, o.vertex);
UNITY_APPLY_FOG_COLOR(i.fogCoord, col, (fixed4)0);
シェーダーを両面表示にする方法
Unityで演出作る場合、シェーダーを探すことになることが多いのですが割と手間がかかります。
そろそろ自前でシェーダー書けるようにとは思ってるのですがなかなか。
今回は板ポリを回転させたりする時に、表示を両面にしたい場合に使えます。
シェーダーを両面表示にする方法
SubShaderのPassの中に、Cull Offのコード一行足すだけでOK。
Shader "Custom/Transparent_Cutout_DoubleSide" {
Properties {
_MainTex ("Base (RGB) Trans (A)", 2D) = "white" {}
_Cutoff ("Alpha cutoff", Range(0,1)) = 0.5
}
SubShader {
Tags {"Queue"="AlphaTest" "IgnoreProjector"="True" "RenderType"="TransparentCutout"}
Pass {
Cull Off
Lighting Off
Alphatest Greater [_Cutoff]
SetTexture [_MainTex] { combine texture }
}
}
}
ちなみに
Cull Backは裏面をカリング(デフォルト)
Cull Frontは表面をカリング
カットアウトシェーダーにカラー・加算を追加する方法
前回の文字を描くようにアニメーションする方法をもう少し良くするべく、シェーダーを作成してみました。
[card2 id=”24″ target=”_blank”]
結果的には、ネットから探したシェーダーのほうがはるかに便利でしたが、徐々に勉強していきます。
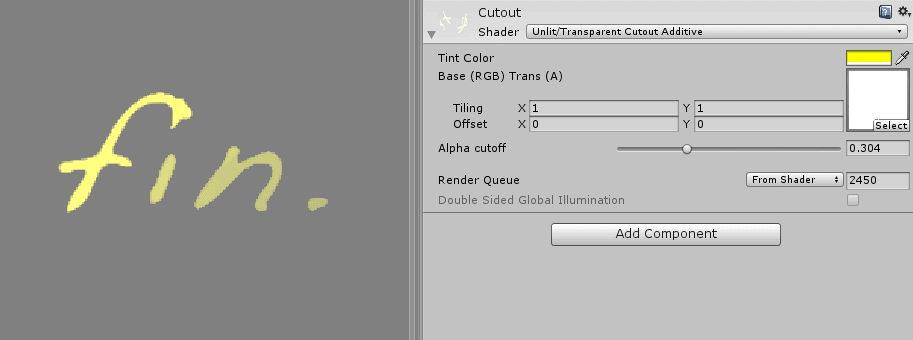
自作でカットアウト(透明・カラー・加算)
一行追加Blend SrcAlpha Oneするだけで、加算になります。
ちなみにアルファブレンドにする場合はBlend SrcAlpha OneMinusSrcAlphaを追加するだけです。
Shader "Unlit/Transparent Cutout Additive" {
Properties {
_MainTex ("Base (RGB) Trans (A)", 2D) = "white" {}
_Cutoff ("Alpha cutoff", Range(0,1)) = 0.5
}
SubShader {
Tags {"Queue"="AlphaTest" "IgnoreProjector"="True" "RenderType"="TransparentCutout"}
LOD 100
Blend SrcAlpha One
Pass {
Lighting Off
Alphatest Greater [_Cutoff]
SetTexture [_MainTex] { combine texture }
}
}
}
TintColorも追加
色も変化できるようにしてみます。
_TintColor ("Tint Color", Color) = (0.5,0.5,0.5,0.5)
AlphaToMask True
ColorMask RGB カラーチャネルの書き込みを設定
        SetTexture [_MainTex]
{
Combine texture, texture
}
SetTexture [_MainTex] {
constantColor [_TintColor]
Combine previous * constant, previous * constant
}
上記を加えてやると
[open title=’Unlit alpha-cutout shader’]
// Unlit alpha-cutout shader.
// - no lighting
// - no lightmap support
// - no per-material color
Shader "Unlit/Transparent Cutout Additive" {
Properties {
_TintColor ("Tint Color", Color) = (0.5,0.5,0.5,0.5)
_MainTex ("Base (RGB) Trans (A)", 2D) = "white" {}
_Cutoff ("Alpha cutoff", Range(0,1)) = 0.5
}
SubShader {
Tags {
"Queue"="AlphaTest"
"IgnoreProjector"="True"
"RenderType"="TransparentCutout"
}
Cull Off
LOD 100
Blend SrcAlpha One
AlphaToMask True
ColorMask RGB
Pass {
Lighting Off
Alphatest Greater [_Cutoff]
SetTexture [_MainTex]
{
Combine texture, texture
}
SetTexture [_MainTex] {
constantColor [_TintColor]
Combine previous * constant, previous * constant
}
}
}
}
[/open]
これで加算とカラーを追加できました。
ただし、もともとの素材がアルファで強弱つけているので、最後にいくとだんだん薄くなってしまいます。
なので、別の方法で表現する必要がありそうです。
カットアウト(透明・カラー・加算・マスク・他)
行き詰まって、検索してみたらやりたいことができるシェーダー見つけました。


[open title=’Transparent/Cutout/Additive Cutout’]
Shader "Transparent/Cutout/Additive Cutout" {
Properties{
[HDR]_TintColor("Tint", Color) = (1,1,1,1)
_MainTex("Base (RGB) Trans (A)", 2D) = "grey" {}
_Cloud1Tex("Cloud 1 (RGB) Trans (A)", 2D) = "grey" {}
_Cloud2Tex("Cloud 2 (RGB) Trans (A)", 2D) = "grey" {}
//_CutTex("Cutout (A)", 2D) = "white" {}
_Cutoff("Alpha cutoff", Range(0,1)) = 0.5
_AlphaThreshold("Alpha threshold", Range(0,1)) = 0.01
_CutoffScroll("Cutoff Scroll Speed", Vector) = (0, 0, 0, 0)
_InvFade("Soft Factor", Range(0.01,3.0)) = 1.0
_Boost("Brightness Boost", Range(1, 20)) = 1.0
_ExternalAlpha("External Alpha", Range(0, 1)) = 1.0
//_AlphaPower("Alpha power", Range(1, 150)) = 1
}
SubShader{
Tags{ "Queue" = "Transparent" "IgnoreProjector" = "True" "RenderType" = "Transparent" "PreviewType" = "Plane" }
Blend OneMinusDstColor One
Alphatest Greater[_Cutoff]
AlphaToMask True
ColorMask RGB
//ColorMask RGB
Cull Off
Lighting Off
ZWrite Off
//Fog{ Mode Off }
//Fog Off
//Cull off
CGPROGRAM
#pragma surface surf NoLighting nofog  //one one alpha// Blend One One
#pragma target 3.0
#pragma multi_compile _ SOFTPARTICLES_ON
sampler2D _MainTex;
sampler2D _Cloud1Tex;
sampler2D _Cloud2Tex;
fixed4 _TintColor;
float _Cutoff;
float _AlphaThreshold;
uniform float _ExternalAlpha = 1;
float4 _CutoffScroll;
float _InvFade;
float _Boost;
sampler2D_float _CameraDepthTexture;
fixed4 LightingNoLighting(SurfaceOutput s, fixed3 lightDir, fixed atten)
{
fixed4 c;
c.rgb = s.Albedo;
c.a = s.Alpha;
return c;
}
float Remap(float value, float inMin, float inMax, float outMin, float outMax)
{
return outMin + (((value - inMin) / (inMax - inMin)) * (outMax - outMin));
}
struct Input
{
float2 uv_MainTex;
float2 uv_Cloud1Tex;
float2 uv_Cloud2Tex;
float4 color : COLOR;
float3 worldPos;
#ifdef SOFTPARTICLES_ON
float4 screenPos;
float eyeDepth;
#endif
};
#ifdef SOFTPARTICLES_ON
void vert(inout appdata_full v, out Input o)
{
UNITY_INITIALIZE_OUTPUT(Input, o);
COMPUTE_EYEDEPTH(o.eyeDepth);
}
#endif
void surf(Input IN, inout SurfaceOutput o)
{
//Arrange scrolling into 2 separate vectors
float2 scrollOffsetCloud1;
float2 scrollOffsetCloud2;
float time;
time = _Time[0];// +IN.worldPos.y;
scrollOffsetCloud1.x = (time * _CutoffScroll.x);
scrollOffsetCloud1.y = (time * _CutoffScroll.y);
scrollOffsetCloud2.x = (time * _CutoffScroll.z);
scrollOffsetCloud2.y = (time * _CutoffScroll.w);
//Pull main texture...
fixed4 mainTexelColor = tex2D(_MainTex, IN.uv_MainTex);
mainTexelColor = mainTexelColor * _TintColor * IN.color;// *fixed4(1, 0, 0, 0);
//..Then get cloud texture and multiply
fixed4 cloud1TexelColor = tex2D(_Cloud1Tex, IN.uv_Cloud1Tex + scrollOffsetCloud1);
fixed4 cloud2TexelColor = tex2D(_Cloud2Tex, IN.uv_Cloud2Tex + scrollOffsetCloud2);
//MAGIC
fixed4 finalColor;
finalColor = mainTexelColor;
finalColor.a = (mainTexelColor.a * cloud1TexelColor.a * 2) * cloud2TexelColor.a * 2;
//Cutoff math
float ca = finalColor.a ;
float a = ca;
float progress = 1 - IN.color.a;
float thresh = _AlphaThreshold;
float fadeMin = clamp(_Cutoff - thresh, 0, 1);
float fadeMax = clamp(_Cutoff + thresh, 0, 1);
float currentAlpha = ca * (1 - progress) * _ExternalAlpha;;
a = clamp(Remap(currentAlpha, fadeMin, fadeMax, 0, 1), 0, 1);
float fade = 1;
#ifdef SOFTPARTICLES_ON
float rawZ = SAMPLE_DEPTH_TEXTURE_PROJ(_CameraDepthTexture, UNITY_PROJ_COORD(IN.screenPos));
float sceneZ = LinearEyeDepth(rawZ);
fade = saturate(_InvFade * (sceneZ - IN.screenPos.w));   //float partZ = IN.eyeDepth;
#endif
o.Alpha = a;
o.Albedo = clamp(finalColor.rgb * a * _Boost, 0, 1) * fade;
}
ENDCG
}
Fallback "Transparent/VertexLit"
}
[/open]
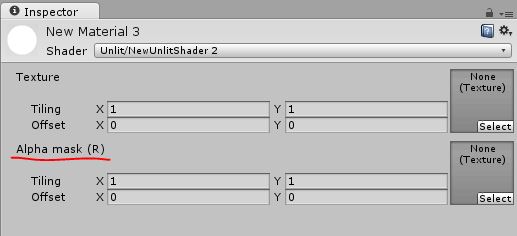
Unlitシェーダーにマスクを追加する方法
勉強がてら、デフォルトのUnlitシェーダーにマスクを追加してみました。
もっと簡単にできるかと思いきや、結構変更箇所が多かったです。
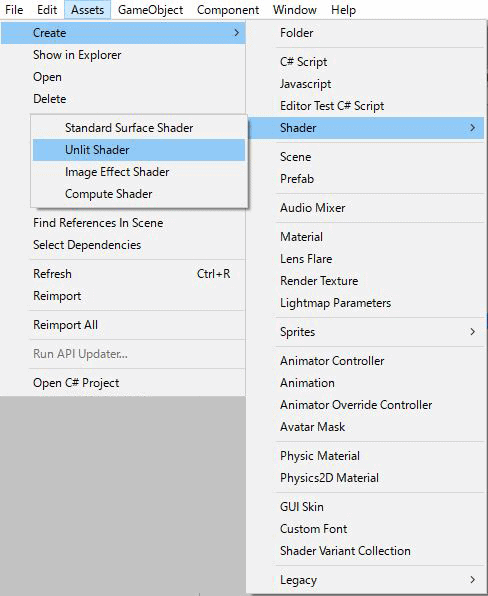
ベースの生成
まずAssets>Create>Shader>Unlit Shaderを選択してベースになるシェーダーを作成
プロパティをセット
6行目に_AlphaTex ("Alpha mask (R)", 2D) = "white" {}を追加
シェーダーにAlpha mask (R)の項目が追加されます。
※ここでPropertiesはシェーダで使う変数とUnityエディタとの関連付けを行う。
タグの追加
10行目のTags { "RenderType"="Opaque" }から
Tags {"Queue"="Transparent" "IgnoreProjector"="True" "RenderType"="Transparent"}に変更
Queue”=”Transparent”
オブジェクトを描画する順番を判定。アルファブレンディングするもはTransparentに。透過オブジェクトはこれにしないとうまく描画されない。
IgnoreProjector
プロジェクターの影響OFF
RenderType
マテリアルのインスペクタープレビューがどのようにプレビューを表示するか示す
- Opaque ソリッド(不透明)
- Transparent 透過してます
アルファブレンディングを使用
12行目にBlend SrcAlpha OneMinusSrcAlphaを追加
計算としてはフレームバッファの(1 – Source Alpha)を乗算。
テクスチャの情報の受け取り
37行目にsampler2D _AlphaTex;を追加
どのテクスチャユニットからどういう方法でテクスチャをサンプリングするかを指定
計算情報を追加
53・54行目に下記のコードを追加
fixed4 col2 = tex2D(_AlphaTex, i.uv);
return fixed4(col.r, col.g, col.b, col2.r);
アルファチャンネルに、Alpha mask (R)にアサインした白黒テクスチャのRチャンネルを使用
フォグのコードを削除
表示結果には影響ないのですが、4箇所のフォグのコードを使わないので消しておきます。
// make fog work
#pragma multi_compile_fog
UNITY_FOG_COORDS(1)
UNITY_TRANSFER_FOG(o,o.vertex);
// apply fog
UNITY_APPLY_FOG(i.fogCoord, col);
結果
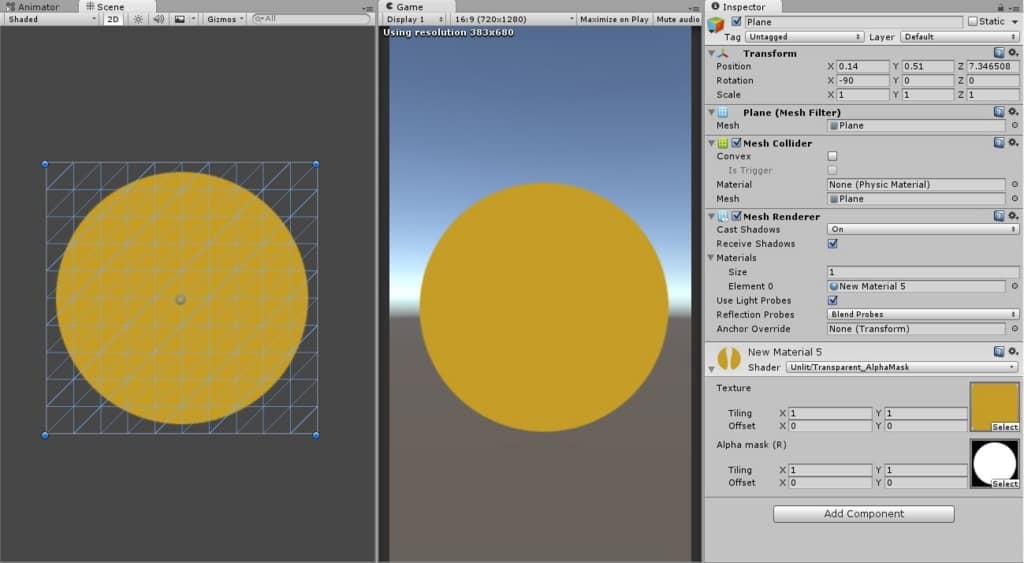
[open title=’Unlit/Transparent_AlphaMask’]
Shader "Unlit/Transparent_AlphaMask"
{
Properties
{
_MainTex ("Texture", 2D) = "white" {}
_AlphaTex ("Alpha mask (R)", 2D) = "white" {}
}
SubShader
{
Tags {"Queue"="Transparent" "IgnoreProjector"="True" "RenderType"="Transparent"}
LOD 100
Blend SrcAlpha OneMinusSrcAlpha
Pass
{
CGPROGRAM
#pragma vertex vert
#pragma fragment frag
#include "UnityCG.cginc"
struct appdata
{
float4 vertex : POSITION;
float2 uv : TEXCOORD0;
};
struct v2f
{
half2 uv : TEXCOORD0;
float4 vertex : SV_POSITION;
};
sampler2D _MainTex;
sampler2D _AlphaTex;
float4 _MainTex_ST;
v2f vert (appdata v)
{
v2f o;
o.vertex = mul(UNITY_MATRIX_MVP, v.vertex);
o.uv = TRANSFORM_TEX(v.uv, _MainTex);
return o;
}
fixed4 frag (v2f i) : SV_Target
{
// sample the texture
fixed4 col = tex2D(_MainTex, i.uv);
fixed4 col2 = tex2D(_AlphaTex, i.uv);
return fixed4(col.r, col.g, col.b, col2.r);
}
ENDCG
}
}
}
[/open]
(http://marupeke296.com/UNI_S_No2_ShaderLab.html
デプス(Depth of Field)シェーダーによる素材の作り方
思いつきで調べて、デプス素材(Depth of Field・被写界深度用の素材)を作ってみました。
※そこまで調べてないので、もっと良い物があるかもしれません。
デプスシェーダーの作成
シェーダーを作成。
マテリアルを作成してCustom/DepthGrayscaleを選択して、オブジェクトにアサイン
o.scrPos.y = 1 - o.scrPos.y;は画面が反転したのでコメントアウト
[open title='DepthGrayscale.shader']
Shader "Custom/DepthGrayscale" {
SubShader {
Tags { "RenderType"="Opaque" }
Pass{
CGPROGRAM
#pragma vertex vert
#pragma fragment frag
#include "UnityCG.cginc"
sampler2D _CameraDepthTexture;
struct v2f {
float4 pos : SV_POSITION;
float4 scrPos:TEXCOORD1;
};
//Vertex Shader
v2f vert (appdata_base v){
v2f o;
o.pos = mul (UNITY_MATRIX_MVP, v.vertex);
o.scrPos=ComputeScreenPos(o.pos);
//for some reason, the y position of the depth texture comes out inverted
//o.scrPos.y = 1 - o.scrPos.y;
return o;
}
//Fragment Shader
half4 frag (v2f i) : COLOR{
float depthValue = Linear01Depth (tex2Dproj(_CameraDepthTexture, UNITY_PROJ_COORD(i.scrPos)).r);
half4 depth;
depth.r = depthValue;
depth.g = depthValue;
depth.b = depthValue;
depth.a = 1;
return depth;
}
ENDCG
}
}
FallBack "Diffuse"
}
[/open]
カメラに下記のスクリプトをつける。
Add Componentした後はデプス用のマテリアルを登録
PostProcessDepthGrayscale.cs
using UnityEngine;
using System.Collections;
[ExecuteInEditMode]
public class PostProcessDepthGrayscale : MonoBehaviour {
public Material mat;
void Start () {
camera.depthTextureMode = DepthTextureMode.Depth;
}
void OnRenderImage (RenderTexture source, RenderTexture destination){
Graphics.Blit(source,destination,mat);
}
}
ニアファーを調整
カメラのニアファーを調整して、白黒のグラデーションを調整
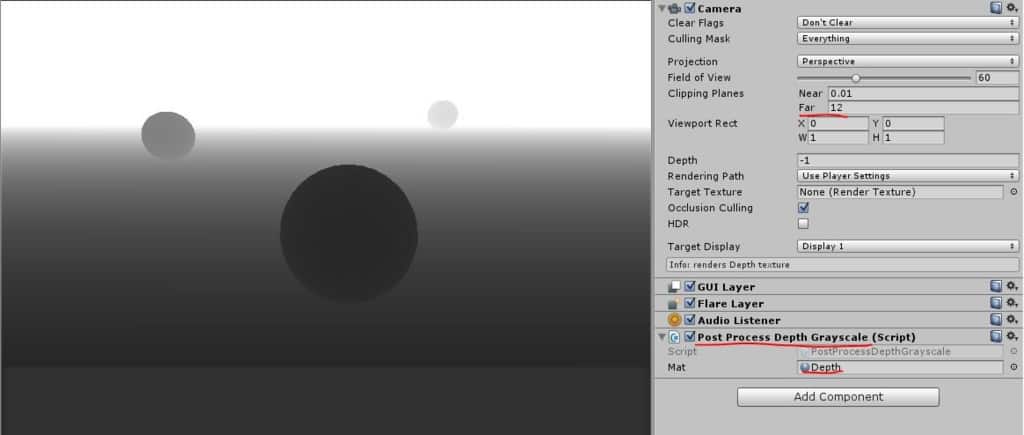
※ちなみにAEで合成する時は白黒を反転した素材を使うことになると思います。
UI制作に関するシェーダーは下記の記事にまとめました!
[card2 id="17307" target="_blank"]